Friday, March 29, 2013

Sweet Chick Easter Card

Today I am sharing my last Easter card for the season; a sweet (and very simple) little chick:


Supplies used:
Lace border: old corner punch by Family Treasures
Greeting stamp: All Year Cheer I - SU
1 3/4" scallop Oval (SU), 2" circle - Nankong
Window Frame Framelit - SU
Ink: Colorbox
Cardstock: Bazzill
3/4" orange ribbon and foam dots
 
Full instructions for the little chick punch art below.


Wishing everyone a Happy Easter!

Thursday, March 28, 2013

Jumping Sheep Card

Here is another version of my little sheep punch art:


This would look really cute jumping over a fence or patch of flowers. Perfect for a "Counting Sheep" layout.

Supplies used:
Lace border: large heart corner punch (Family Treasures)
Doily - heart border punch (PB)
Cardstock: Bazzill
Expression stamp: Making Memories "Express It" magnetic stamps
Large scallop oval punch  (PB), designer label punch (SU)
Inks: Colorbox
Patterned paper - unknown
Pink Satin ribbon and foam dots

The punch art instructions are basically the same as my sheep from the last post, but I thought I'd write them up anyways. See below.

 
Next post I'll have one more Easter card featuring a sweet little chick.


Monday, March 25, 2013

Spring Lamb Easter Card

Today I have a little spring, punch art lamb to share.
This design would work great for several themes: spring, Easter, baby and even Valentines (I love Ewe); or maybe an a Scrapbook page featuring a sleeping child.


Supplies used (other than for the punch art sheep):
Mega/s. giant 72 mm oval (PB)
Window Frames Framelit - SU
Large tag punch - SU (the black mat was hand cut)
Greeting stamp - All Year Cheer I -SU
1 1/4" beige ribbon, 5 3/16" purple pearls
Ink : Colorbox
Cardstock - Bazzill
patterned paper - unknown
Sheep and tag are popped with foam squares

Full punch art instructions for the sheep:


Next post I'll have another version of this cute little sheep.


Friday, March 22, 2013

Brown Bunny Easter Card

As promised here is another bunny punch art Easter card.


This little fellow is very excited about Easter and looks eager to have everyone join in the egg-hunt.

Supplies used (excludes bunny punch art- those instructions are below):
Cardstock: Bazzill
Greeting stamp - SU All Year Cheer
Dies: Oval Framnelits by SU
Dots embossing folder by SU
The little flower under greeting uses the leaf from SU bird builder, 3/16" circle EK Papershaper and 2 Small Lotus - Ek Papershaper.
Inks: Colorbox

full punch art instructions below:


Hope my little critter has inspired a few of you. Thanks for stopping by.

Shy Bunny Easter Card

I made a few cute punch art Easter cards that I thought were worth sharing.

First up is a sweet and very shy little bunny who wants to share his Easter treats with you:


Supplies used for the card (other than the punch art bunny- instructions for him are below):
 
Greeting Stamp: SU - All Year Cheer
Embossing folder: Sizzix Ornate Swirls
3/4" circle punch (PB) 7/8" scallop circle punch (SU)
Oval and scallop Oval - Oval Framelits (SU)
Carstock - Bazzill, patterned paper - unsure (was a scrap I had)
All edges have been inked with Colorbox inks.
 
Full punch art instructions for my Shy Bunny below:
 

Next post will be a very sly, littlle punch art bunny card.

Sunday, March 17, 2013

3D Easter Tree Ornaments 4

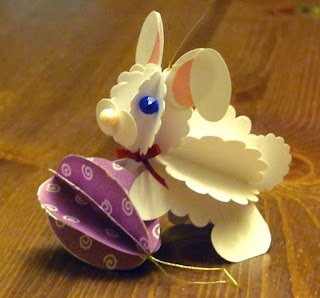
Last but not least, today I am sharing my bunny ornament.


 He looks more difficult to make than he is. Supplies needed as follows:
Punches:
Ears: 2 large oval (SU), 2 small oval (SU) +  2 small pink - inner ears
Muzzle: 1/2" circle (PB), 2 in white
Hind legs: large heart (PB), 2 in white
Head: 1 1/4" scallop circle (SU) 8 in white
Body: 1 3/4" scallop circle (SU) 8 in white
Tail: 7/8" scallop (SU) 1 in white
Other supplies: small red ribbon, 2 blue or black beads (approx 1/4 - 3/8" size) for eayes and one small 1/8" white or pink bead for nose.
4-5" thread or string for hanger
 
Assembly instructions:
create the head and body as with the ornaments from the past few posts: crease and fold all circles in half, then glue together.
Glue the muzzle pieces together as shown in picture. Glue nose bead to center top and let dry. Glue ear pieces together using photo as a guide.
Glue muzzle to the center front of the smaller 3d circle. Glue eye beads inside the folds on either side of the muzzle and the ears to the back of those same folds.
Glue head to top of body (note the folds of the body face the opposite direction of the head's folds).
Glue legs into the bottom folds of the body and the tail on the back.
Then add hanger to top of  head and bow to front of neck.


Make sure you let everyhhting dry before you hang the ornament. I use Mono Multi glue; it dries really fast.

Friday, March 15, 2013

3D Easter Tree Ornaments 3

As the post I had meant to publish last night only went up a few hours ago there will be two today.

The next punch art ornament is my little chick:

 
This ornament requires a little more work then the other two.
Supplies used as follows:
 
yellow and orange cardstock - Bazzill
2 black beads, approx. 3/8" size
punches: scallop oval (SU) - 8 shapes, Blossom Builder (SU) smallest leaf - 2 for the wings, medium crystal snowflake (PB) 2 in orange (feet) and 1 in yellow (feathers for top of head), small diamond (PB) for the beak.
small ribbon bow and thread for the hanger. I also added highlights to the eyes with a white painty pen.
Assembly - the body was done the same as the egg from the other day; score and fold all 8 scallop ovals down the center lengthwise and glue together joining the last with the first to create the a 3D oval. The beak was creased and folded across the middle and glued to the center front. The eyes were glued into the folds on either side of the beak and the wings to the back of those folds on either side. Trim the snowflakes for the feet and feathers as shown below:


The feet were folded across the middle and then glued to the bottom of the body. The feathers we folded in half and glue to the top of head along with the hanger thread. Then attach the bow to the front.
I used Mono Multi glue as it really holds well and dries fast.

Come back tomorrow for my 3D bunny instructions.

3D Easter Tree Ornaments - 2

As promised here is my second 3d punch art ornament, a pretty flower


Again, this one is quite simple. Required supplies:
mega/super giant flower punch - I used my Nankong Daisy, but any flower roughly the same size will work. For example: SU's Fancy Flower, Blossom or retired 5 Petal Blossom punch. You'll need two to layer them, slighlty off set.
The center is SU's 7/8" scallop circle - you'll need 4 (a basic circle will also work). Assemble same as the egg from yesterday. Score down the middle and fold in half then glue the circles together and then to the center of the blossom.
You'll also need 4-5" of thread/string for the hanger.

Come back tomorrow for my cute little 3d chick ornament.

Wednesday, March 13, 2013

3D Easter Tree Ornaments

Ever since I was little we made an Easter tree. It was the center piece on our kitchen table and generously decorated with little homemade ornaments.

Generally these were crafted from blown-out eggshells; very delicate. No matter how carefull we packed them several would break every year.

This year I decided why not incorporate my love of paper crafting into making Easter tree ornaments - fast, fun and much more durable.
So last night I sat down and came up with 4 fairly quick designs. Well, 3 are pretty quick and easy, the last is a little more involved, hence it will be the last I share as it requires more detailed instructions.

The first is the simplest, one punch to make a 3d egg.

 
Very easy. All you need is glue (I used my trusty Mono Multi), 4-5" thread/string for a hanger, patterned or bright coloured cardstock and a Mega/super giant punch that resembles an egg shape.
 
I used my mega egg by Nankong, but SU's large 2" oval or even SU's scalloped oval would work really well too.
 
I simply punched 8 identical shapes, scored and folded them down the middle and then glued them together to form a 3d shape. The hanger was glued to the center top just before joining the last 2 pieces.
 
I think this would work really well with 2 coordinating colours of cardstock, like yellow and orange. Just punch 4 of each and then alternate the colours when assembling and you'll end up with a vertically striped egg.
 
here's a little preview of my 3d bunny ornament


Isn't he adorable? He's the most involved design of the 4, so he's last. Next post I'll have a pretty 3d flower to share.


Tuesday, March 12, 2013

Medallion Punches 4

Here is the last of my four medallion punch cards, this uses the pink punch shown in my previous post.


This is a very clean and simple card. I punched a white piece of cardstock along one edge, evenly sapced, 4 times to create a peek-a-boo border. Then I lined it with little (small square punch) pieces of cardstock to create a stained glass effect. Thsi was mounted on black and then onto a white card base.
 
Supplies used:
Punches: medallion punch, small 1/2" square punch
Greeting: All Year Cheer I - SU.
Ink- Colorbox
Cardstock: Bazzill.


Monday, March 11, 2013

Medllion Punches 3

Today I have my third medallion punch card.
This one uses the third/green punch shown in yesterday's post.


Supplies used (other than the medallion punch):
3/8" wine coloured satin ribbon and 1/4" red bling/rhinestones
Cuttlebug swirls embossing folder
Greeting: All Year Cheer I (SU)
Large oval and decorative label punch (SU)
Colorbox black ink
Greeting is popped with foam squares.
Cardstock: Bazzill
 

Sunday, March 10, 2013

Medallion Punches 2

Today I have the second card I made using one of my medallion punches. This one uses the second/blue punch shown below (I have no idea what this design is called).


Supplies used as follows:
Scallop lace border punch (PB)
Modern label punch (SU) - used to trim the sides of the greeting mat,
1" circle punch (PB) for the yellow and terracotta coloured circles behind the lace.
Greeting stamp: Simple Sayings (SU).
Red and clear 3/16" bling/rhinestones.
Cardstock: Bazzill
Black ink: Colorbox
 

Wednesday, March 6, 2013

Medallion Punches

I've been on a little bit of a buying spree as of late (a large SU order plus several ebay winnings).

After I opened the packages of my newly acquired treasures and found homes for them amongst my ever growing collection of tools I noticed 4 old medallion punches on my shelf that haven't been used in ages.


This led to wanting to make use of these; after all I have to justify keeping them.

After a little bit of playing I came up with a few clean and simple designs that I thought I'd share.

Note that these All Night Media punches and are no longer available, unless you can find them on ebay. Although I did noticed that Punch Bunch does sell the first one (yellow), they call it a "Renaissance Square punch".
This is the punch I used for my first card:

 
Supplies used other than above medallion punch:
Cuttlebug swirls embossing folder, SU greeting stamp (All Year Cheer),  29 mm scalloped square (PB), and diamond lace border (Emagination) and a 1" square (PB).
The black square was hand cut, I used the 1" square punch for the rainbow coloured cardstock that I adhered behind my medallion border.
Related Posts Plugin for WordPress, Blogger...