Wednesday, September 28, 2016

Topiary Gift Set

I decided to make card sets consisting of 3-5 cards as gifts for a few of my friends for this Christmas. As we are now officially in autumn it is high time I get started or they wont all be finished in time.

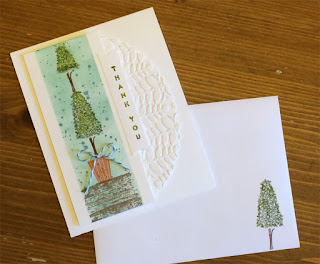
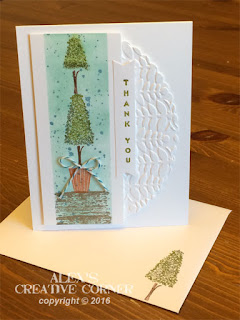
This is the first card trio I made. It uses the SU Vertical Greetings stamps that so far I have pretty much ignored. I'll be really honest, my main reason for purchasing this set was the greetings, not the topiary planters. However, now that I've had the chance to play with them I quite like them and plan on using them again.


I started by cutting a piece of white cardstock in half length wise to create a 5.5" x 8.5" strip. I then masked off three sections evenly spaced approx. 1.5" wide. I sponged each strip in light blues (Pool Party & Soft Sky) and stamped them with the spotted background texture from Gorgeous Grunge using a darker blue (Marina Mist). Then the ground was stamped in brown (Tip Top Taupe) using a stamp from Timeless Textures.


Using markers I coloured the Topiary stamps, above sample used Chocolate Chip, Mossy Meadow, Always Artichoke and Cajun Craze for the pot. I also stamped a shorter "cut" version of the topiary on the inside bottom right of the card and bottom right of the envelope to mach.


Above heart topiary uses the following markers: Chocolate Chip, Blackberry Bliss and for the pot Delightful Dijon.
Again I added a shortened image to the envelope and inside of the card


The last topiary uses Chocolate Chip, Mossy Meadow, Old Olive and Tangerine Tango. Note I wanted a slightly taller tree, so re-inked the top portion of the stamp and added a little tree at the top. 
I then trimmed all the image strips to leave a approx. 1/4" white edge on both sides.


For the little greetings I matched ink colours used to the image, ie above the sentiment is Old Olive, the other two use Blackberry Bliss and Always Artichoke. Next I chose three different embossing folders with leafy images and embossed a 4" x 5" piece of white cardstock in each. I then cut each texture into a different shape (circle, oval...)


The cards were assembled as follows. texture embossed shape adhered direct to white card base. using foam tape/mounting squares the image strips were attached towards the left of the card. The sentiment strip was trimmed in fishtails on both ends using the banner punch and glues directly onto the image strip, overlapping the textured shape.


Lastly I added coordinating bows tied from butchers twine. On the heart shapes topiary I also highlighted the flower centers and pot using a white gel pen.

Supplies used:
Cardstock: Recollections 110 lbs white
Stamps: Vertical Greetings, Gorgeous Grunge, Timeless Textures - SU
Punch: Banner - SU
Embossing folders: Vine Street - Su, Christmas Elegance, Branches - both Sizzix
Dies: Circle Framelits, Oval Framelits, Deco label - all SU
Ink: Pool Party, Soft Sky, Marina Mist, Tip Top Taupe - SU
Markers: Old Olive, Mossy Meadow, Always Artichoke, Chocolate Chip, Delightful Dijon,
               Blackberry Bliss, Cajun Craze, Tangerine tango - all SU
Misc.: white gel pen, bakers twine (pink, light blue, yellow), Foam tape/mounting squares

Thanks for stopping by! Hope to see you again soon. 

Monday, September 26, 2016

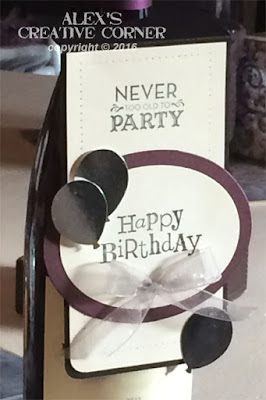
Wine Bottle Tag

This was a quick project. I didn't ave a wine bottle bag handy and was gifting a bottle to a friend. So i quickly made a cute but masculine bottle tag for him.

This was simple and didn't require a special bottle tag die either.


I opted to match the colours of the bottle itself as I don;t like to clash. I used a strip of black cardstock as my base, approx 3.75" x 11" long. I rounded the corners with a corner rounder punch and then placed it on my score pad. and scored across to create a square at one end (3.75")
I folded at the score mark and the using a 1 3/8" circle punch cut a hole in the center of this square area. This crated the hanger.


As this is for a male friend I kept it clean and simple. in ivory cardstock I cut a piece to fit onto the front panel as well as an oval shape for my main sentiment. the panel was accented with a paper pierced border. I stamped a secondary sentiment at the top and attached this to the front of the tag.

The mains sentiment was mated onto a larger purple oval and attached to the front of the tag. I finished it off with a little silver organza bow and a few punched foil balloons that were attached with foam squares for bit of dimension.

Supplies used:
Cardstock: Recollections
Stamps: Wacky Wishes, Let Your Hair Down - SU
Ink: Tuxedo Black - Memento
Dies: Oval Thinlits - SU
Punch: Balloon Bouquet - SU, 1 3/8" circle - SU, corner rounder - Marvy
Misc. paper piercing tool & mat, piercing template (SU), organza ribbon, foam tape/mounting squares.

Thanks for stopping by! Hope to see you again soon. 

Saturday, September 24, 2016

Stamped artwork

As you may recall, we are undergoing renovations (for way too long already). The latest room we've been working on is the dining room. We are almost finished, just need to hang the new ceiling fixture/chandelier and paint the French door white.

Before the renovations started I had an ugly painting hanging on one wall and the rest were bare. Suffice it to say I was not happy with the look. I decided that the long wall needed some picture rails and art work, along with a large clock in the center. I found the clock I liked rather quickly but had a tough time when it came to artwork as I was looking for a specific colour scheme.

I finally gave up looking and figured I'd be happier with something I created myself.
I purchase 8 small (8 x 10") blank canvases at my local Dollarama.
Then I went to my little craft room pulling out various supplies that could help me create some artwork to fill up the picture rails. I found several scrapbook papers in the right colours that would work rather well along with some wonderful foam stamps I had purchased ages ago for scrapbooking and an entire drawer full of Making Memories paints as well as my unused stash of Tim Holtz and Club Scrap stencils.

The first set of canvases (4) were decoupaged with scrapbook papers and set aside overnight to dry.
The next day I chose several foam stamps with scroll/flourish designs and using brown paint stamped the images onto the decopage canvases. I also added a word to each canvas using large foam letter stamps. Once the paint was dry I finished the canvas edge by wrapping it with some natural coloured jute scoring the ends with a bit of glue form a glue gun.


The four remaining canvases were painted using acrylic paints in similar colours as the decoupage scrapbook papers. Once dry I used my stash of stencils to paint random designs in coordinating colours. I am honestly not 100% happy with two of them, although my daughter stated they look fine in the finished grouping.


Here is a look at my finished wall.


I think the paintings turned out rather nice and my investment, other than what I already had in my stash, was a whole $8 for the canvases. I consider this project a success and think in future  I may again dig into my craft stash to create some home décor.

Supplies used:
blank canvases
Patterned paper: Karen Foster 12x12": Antique Gold, Harvest Blend, Yellow Garden,
                           ScrapEase 12x12": Fossil Relief Green
Acrylic paints: Making Memories scrapbook paints
Foam stamps: Making Memories: Corners, Floral, Dingbats, Jersey upper case
Stencils: May 2006 Flowers, October 2003 Bricks, Novembor 2005 Memoir Scroll- Club Scrap,
              Rays, Clockwork -Tim Holtz
Misc.: foam paint brush, foam dauber, jute, glue gun

Thanks for stopping by! Hope to see you again soon. 

Thursday, September 15, 2016

Rainbow Fish

As you may have noticed I have not used the fish image in the By the Tide stamps set yet.
I left this for later as I really intended to play with different finishes.

I remember when I was little and my dad took me fishing it was my job to help clean the fish we caught. Growing up in BC this consisted of many salmon. I remember being rather fascinated by the pearlescent rainbow colours of the salmon scales.


I think I achieved a rather lovely shimmering finish on these little fish, although be it they are not salmon and I did take some rather large liberties with these rainbow colours.

The background was created by sponging the cardstock using light blue ink. I then stamped the "bubbles" with a matching darker shade and SU Gorgeous Grunge stamp and the sandy ground in Sahara Dessert using a stamp from Timeless textures. Next I stamped the coral using Calypso Coral and the grass using Old Olive and Mossy Meadows ink. I repeated the same to create the card interior.

 Next I the jelly fish (up-side-down) on the card front only using Versamark and white embossing powder.

The fish were stamped on a separate piece of white cardstock in black ink and coloured using alcohol markers. I then went over them with my Versamark pen and embossed with SU's Iridescent Ice embossing powder. I hand cut the fish from the cardstock, shaped them from the back using a stylus and attached to the card front using foam tape.
it is rather difficult to catch the shimmer on photos, but here is a close up so you can see it a little better.


The card front was trimmed to 3.75" x 5" and double matted on dark teal and sand coloured cardstock. A off white piece of twine was tied along the right edge and then the card front was attached to a white card front (A2 size) with foam tape.


The envelope flap was stamped to match the scene on the card front; sand, bubbles and coral using the same ink colours.

Supplies used:
Cardstock: Recollections white and sand, Bazzill teal
Stamps: By the Tide, From Land to Sea, Gorgeous Grunge, Timeless Texture,
              Remebering Your Birthday - all SU
Ink: Coastal Cabana, Bermuda Bay, Calypso Coral, Sahara Sand, Mossy Meadow, Olive Green - SU
        Tuxedo Black - Memento, Versamark,
Alcohol markers: BG10, BG13, BG15, BG18, BG70, BG72, G00, G02, R11, R22 - All Copic
Misc.: hite embossing powder, Iridescent Ice embossing powder, Versamarker, foam tape/mounting squares, twine

Thanks for stopping by! Hope to see you again soon. 

Tuesday, September 13, 2016

CAS Seahorse Card

I just love playing with these seaside themed stamps and can't seem to get enough of them.
This fats and simple CAS card was created in a mere few minutes and looks rather nice if I do say so myself.

I started by masking the card panel on either side using re-positionable adhesive tape and copier paper. I then created the background using the ink on stamp block technique as described in my previous posts. next I  stamped the coral using Cajun Craze, the bubbles using Gorgeous grunge and white ink and the jelly fish (up-side-down) in Versamark and white embossed powder.


The seahorse was a leftover image stamped on scrap white card in black from a previous card. I coloured it using alcohol markers, fussy cut it from the cardstock and glued it to the card front.

I then removed the mask and cut the strip leaving a 3/8" white edge on either side.  I drew a black line about 1/8" from the background and using my SU piercing tool and guide template I pierced a straight border one either side. A small piece of coloured twine was tied near the bottom and then the strip was attached to my card front using foam tape.


Lastly added a few little pearls above the seahorse and stamped my greeting to the right of the border strip directly onto the card base.

Supplies used:
Cardstock: Recollections white
Stamps: By the Tide, From Land to Sea, Vertical Greetings, Gorgeous Grunge - all SU
Ink: Bermuda Bay, lost Lagoon, Island Indigo, Craft White - SU, Memento - Tuxedo Black,            
        Versamark
Alcohol markers: Copic: YR04, YR02, YR24
Misc.: white embossing powder, white gel pen, black marker, pearls, foam tape/mounting squares, twine, paper for masking

Thanks for stopping by! Hope to see you again soon. 

Thursday, September 8, 2016

Seahorses and Seashells

Keeping to the sea life theme I have created a third card, this time focusing on the By the Tide stamp set. This one features the seashells and adorable little seahorses. I changed the colour up a little and used more warm greens and orange hues vs the cool aqua and turquoise shades in my two previous cards.


I again made the background paper using inks applied directly to a clear stamping block; spritzed with a bit of water and then stamped off onto white cardstock. Any bare spots were filled in with lighter shades of ink using a sponge. Note I made two background pieces 9 approx. 4" x 5" in size so the inside can be finished to match the card front.

Next I stamped the coral in Versamark and embossed with white embossing powder. To highlight the embossed area I added a little Brown Sugar to the centers of each coral with a sponge. I then stamped the two seahorses towards the right of the card directly onto the background and coloured them using Copic markers. I added shadow shading to create a little depth and white gel pen highlights for added definition.


I didn't plan the layout of the card ahead of time, so when I decided I needed a third seahorse to the left, on top of the coral, I opted to stamp this on a scrap piece of cardstock, along with the seashells. Once these were coloured they were cut out/fussy cut. The sea horse was glued directly onto the card front where as the seashells were formed using a stylus on the back and then attached with a bit of foam tape to keep the 3D effect in tact.

The card front was trimmed to 4.75" x 5" and attached with foam tape onto a coral coloured mat measuring 4" x 5.25". My card base is ivory this time, not bright white. Finishing touches consist of several randomly placed pearls and little bit of twine tide to the right side of the card.


The inside was finished to match with a personalized message using several different sentiment stamps, choosing only the words I needed.

I had a strip of leftover background paper which I attached to the envelope flap for a cohesive finish.


Supplies used:
Cardstock: Recollections ivory and white, Bazzill peach/coral
Stamps: By the Tide, Handbill Headlines, Edgy Eloquence, feeling Sentimental - all SU
Ink: Pistachio Pudding, Mint Macaron, Coastal Cabana, Bermuda Bay, Crumb Cake,
        Baked Brown Sugar, Tangerine Tango - all SU, Versamark, Memento - Tuxedo Black
Alcohol markers: YR04, YR02, YR24 (sea horses), YR000, YR00, YR02, BG10, BG13 (seashells)
                             C1, C3, C5, C7 (shadows) - All Copic
Misc.: white embossing powder, twine, various sizes of pearls 1/16", 1/8", 3/48"),
           foam mounting tape, sponge, water spritzer

Thanks for stopping by! Hope to see you again soon. 

Wednesday, September 7, 2016

Under the Sea Shaker Card

If you recall, the card I shared in my previous post was finish on the inside to match the front of the card. In order to create the writable white/negative space I masked my cardstock when I created the background. Well the mask turned out rather lovely and would have been a great waste to throw away. I decided to use it for the background of a seaside shaker card instead.


To recap, the background was crated by using plain white cardstock and 5 ink pads in teal and turquoise shades. I inked up my largest clear stamping block. Applying the ink pads direct to the stamping block. I then gave it a little spritz with a little water mister and then randomly stamped onto my white cardstock until no ink remained on the block. The areas not fully filled in where finished by sponging with a little of the two lightest ink colours.

Next I stamped the coral image in Cajun Craze and embossed using iridescent ice embossing powder. using Versamark I stamped the jellyfish (upside down) and embossed with white embossing powder.

On a scrap of white card I stamped the turtle image and coloured it using Copic alcohol markers. The image was then fussy cut and attached to the background with foam mounting tape.
I then cut clear plastic to slightly larger than my background. Next I cut 4 strips of 1/4" thick foam mounting squares from a full sheet to create the edging on the shaker. II added my filler and attached the clear plastic to seal in the contents.


Using Cajun Craze I stamped a textured image all over brown cardstock and then cut an opening slightly smaller than my shake in the center to create a frame. the frame was trimmed to 4" x 5.25" size and adhered over top of the shaker, which was then glued to the card front.

I had a little piece of coral (tree die cut) left over from the last project so decided to add it to the card front along (and inside) with a few randomly placed pearls.

I finished the inside to match the theme, by sponging the edges of my white cardstock in the teal/turquoise colours, adding a second frame and another piece of coral.


Supplies used:
Cardstock: Recollections white, Bazzill coral
Stamps: From Land to Sea, By the Tide, Timeless Textures, Remembering Your Birthday - all SU
Ink: Tuxedo black - Memento, Coastal Cabana, Bermuda Bay, Lost Lagoon, Island indigo,
       Tempting turquoise (all for the for background), Cajun Craze - SU, Versamark
Alcohol markers: Old olive, light and medium - SU Blendabilities,
                             YG25, Y21, Y32, Y35, YR24, 100 - Copic
Die: Beautiful Branches Thinlits - SU
Shaker filler: peal blue, pearlescent pink and pearl sequins, clear micro beads, pale blue sea glass
Misc.: white embossing power, iridescent ice (SU) embossing powder,clear plastic sheet, foam mounting tape, 1/4" foam squares, water spritzer, sponges

Thanks for stopping by! Hope to see you again soon. 
Monday, September 5, 2016

Under the Sea

Do you ever have buyers remorse when it comes to stamping supplies? I don't often because I generally procrastinate quite a long time before committing to buy. And honestly I haven't bought many supplies that I regretted buying later on. what I am referring to is more the kind of guilt you develop over buying stamps and then having them sit on a shelf for a very long time without ever seeing ink. The kind I had an abundance of this weekend.

I am lucky enough to have a a great husband who fully supports my creative en devours. So much so he gave me card Blanche this past week to spend whatever I thought was sufficient on SU supplies for my birthday. After placing my order I went to my craft room and started tidying so I could have a clean work surface for when my new treasures arrive.

To my utter dismay I discovered quite  a few stamps sets from my last order, about 4-5 month ago, that haven't been touched. So in order to rectify this situation I have challenged myself to use each and every one of these sets before I can touch my birthday order.

This lovely under water card and matching envelope is the first creation of this self-challenge.


I started by creating the water background using plain white cardstock. I gathered 5 ink pads in teal and turquoise shades. Using my largest clear stamping block as my canvas I randomly stamped each color directly onto the block and then gave it a little spritz with a little water mister. I randomly stamped onto my white cardstock until no ink remained on the block. The areas not fully filled in where finished by sponging with a little of the two lightest ink colours.

I repeated this on a second piece of cardstock to create my envelop liner and also masked a 1" wide strip on the flap of my envelop to create a matching border.


Next I stamped the jelly fish image (upside down to mimick plant life) several times using Veramark and white embossing powder. I then added the coral image once for a bit of texture. The turtles were stamped three times onto a scrap piece of white card and coloured using Copic alcohol markers. All three turtles were fussy cut. Two turtles were shaped a little from the back using a stylus and then attached to the card front with foam tape. I cut 2 trees with the die from coral coloured card and trimmed them to fit into the comers of the card front, reserving the scraps. Note for added dimension the coral was attached by trimming foam tape into very thin strips


Using the same technique as for the background I coloured another piece of cardstock 5.25"x4" in size , masking the center area (approx. 4.5" x 3") to keep it white for a personal greeting. I then attached the third turtle and left over scrap of coral and stamped the birthday greeting in black.


Lastly I trimmed the second piece of cardstock I had coloured to create the card liner and glue it into the envelope.

Supplies used:
Cardstock: Recollections white, Bazzill coral
Stamps: From Land to Sea, By the Tide, Remembering Your Birthday - all SU
Ink: Tuxedo black - Memento, Coastal Cabana, Bermuda Bay, Lost Lagoon, Island indigo,
       Tempting turquoise (all for the for background), Calypso Coral - SU, Versamark
Alcohol markers: Old olive, light and medium - SU Blendabilities,
                             YG25, Y21, Y32, Y35, YR24, 100 - Copic
Die: Beautiful Branches Thinlits - SU
Misc.: white embossing power, foam mounting tape, water spritzer, sponges

Thanks for stopping by! Hope to see you again soon. 
Saturday, September 3, 2016

Hello Friend Frog

I had planned to upload this card much earlier this week, but free time seems to have been an issue for me.

I fell in love with all the adorable little critters in the Love You lots SU Hostess set, but have to say that the frog is my favorite by far.


I started by stamping the frog on a scrap white piece of cardstock and then adding the jar. Using Copics I coloured the frog and added shading below him and around the jar edges. The jar was then die cut using the matching jar die and a little bakers twine was tide around the top.


I trimmed my green card front to 5.25 x 4", embossed it, inked the edges and attached to the card front slightly skew. the brown cardstock is approx. 4" x 3.25". The edges were also inked before attaching to the card. A coordinating strip of patterned paper was dded and then I attached the jar using foam tape. The "Hello"  sentiment was cut from pink and the "friend" was stamped in black on scrap white that was trimmed into a banner shape.


I finished the inside of the card to match using scrap appertained paper in the corners and stamping a couple of little frogs int eh opposite corners.

Supplies used:
Cardstock: Recollections, Bazzill
Pattern paper: Momenta 6 x 6" textured cardstock pad
Stamps: Love You Lots - SU, Jar of Love - SU
Dies: Everyday Jar Thinblits - SU, Hello Thinlits - SU
Ink: Memento Tuxedo Black, Cherry Cobbler, Old Olive, Chocolate Chip - SU
Alcohol markers: YG03, YG25, W1, W3, W5, BG13, BG15 - Copic
Embossing folder: Forest Branches - Provocraft - Cuttlebug
Misc.: bakers twine, foam mounting tape/squares

Thanks for stopping by! Hope to see you again soon. 
Related Posts Plugin for WordPress, Blogger...