Wednesday, April 29, 2015

Goth inspired birthday

No birthday set would be complete without a handmade card. I  opted for smaller roses for this, but still sued the same basic instructions as found here. I made these blossoms using the SU Pansy punch and for the small ones the SU Petite Petals punch.


If you look at the close up you can see that the smaller blossom are not all the same. 3 are made with the Petite Petals, and are 2-3 layers, the other 3 are "buds" only and are made from one single Pansy.


Supplies used:
Cardstock: Recollections
Stamp: Remembering Your Birthday - SU
Ink: Memento, Tuxedo black
Die: Spellbinders - A2 Tranquil Moments
Punches: Pansy - SU, Petite Petals - SU, Blossom Petals (builder, 2nd smallest) - SU
Misc.: Gold shimmer mist, 5/8" black organza ribbon, pearls- 4 x 3/8" 4 x 3/16" 2 x 1/16".
 
Thanks for stopping by! Hope to see you again soon.

Monday, April 27, 2015

Goth inspired gift boxes

I had intended to publish this post Friday/Saturday but unfortunately my PC crashed and I was unable to access my hard drive for the photos. I cannot even start it up anymore, it immediately crashes (just love that blue screen).
Had to purchase a new PC, admittedly it was time anyways.
Finally got the new PC yesterday (am not sure I am a fan of windows 8).
Please bear with me over the next week as my posts my not all be ready as I had originally scheduled/intended.
I managed to get my latest photos loaded from my camera, Photoshop is installed, MS office is installed ... etc. but there are still things I need to put on this new PC over the next week or so.

Now to my post, I made a couple more Goth inspired gift boxes to match my berry basket from my last post. The roses are all the same design as well.
The hamburger box uses the Blossom punch (instructions found here) and the curvy keepsake box uses the same instructions but with the pansy punch.

Hamburger box:


 Curvy Keepsake box:


Supplies used:
Cardstock: Recollections
Ink: Memento Tuxedo Black
Stamp: Simply Sketched - SU
Dies: Hamburger Box - SU,|Curvy Keepsake Box - SU, Fancy Tags Two - Shapeabilities - Spellbinders
Punches: Blossom - SU, Pansy - SU
Misc.: white paper doilies, 2 x 1/4" red rhinestones, 1 1/2" black ribbon, string of 1/8" pearls, 5/8" black, organza ribbon, gold shimmer mist.

Thanks for stopping by! Hope to see you again soon.

Thursday, April 23, 2015

Red Rose Berry Basket

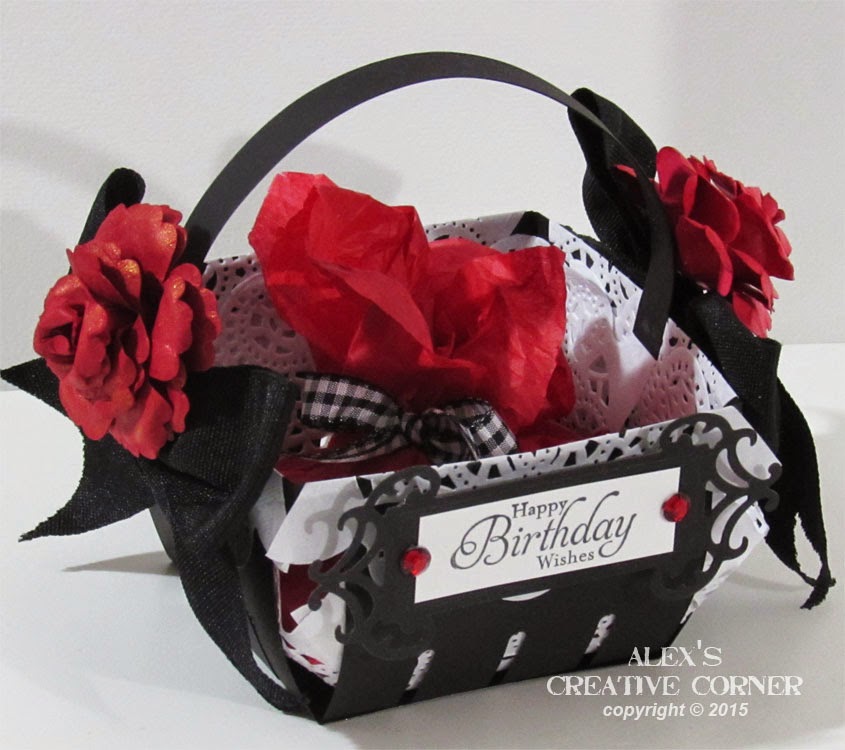
As I've probably mentioned before, my daughter is a big fan of anything goth inspired. As her birthday is next month I've been working on some gift boxes and let myself be inspired by her love for goth. I therefore incorporated deep red, black and white and a touch of lace into the design.

Here is the first little goody, my goth inspired berry basket.


I love how great this turned out. It really shows how versatile the berry basket die can be.
I cut my basket from black card base. Lined it with white doilies and added a big black ribbon bow to both side of the handle.


On top of each bow I glued a handmade, red paper rose spritzed with gold shimmer. My roses were made using the SU Blossom Punch. Instructions are at the end of this post.


I added a very decorative label to the front embellished with a little red rhinestone bling.

Supplies used:
Cardstock: Recollections
Stamp: Simply Sketched - SU
Ink: Memento Tuxedo Black
Dies: Berry basket - SU, Fancy Tags Two - Shapeabilities - Spellbinders
Punch: Blossom - SU
Misc.: 1.5" wide black ribbon, 2 x 1/4" red rhinestones, 4 small white doilies, foam mounting squares, gold glimmer mist, and for my gift, red tissue and a gingham ribbon scrap.

Full instructions for my roses below.

Thanks for stopping by. Hope to see you again soon.

Tuesday, April 21, 2015

Little Thank you

I made one more quick card using the Secret Garden stamp set. This one really came about due to left over blossoms from my previous projects. When  I started I had stamped several images and coloured them all not knowing yet which I would use on that card. Once it was done I had two left over blossoms which I didn't want to waste; so I made this cute little thank you card.


This card is only 2.75 x 2.75" and perfect for a Thank you gift card.

 
Supplies used:
Cardstock: Recollections (110 lbs white)
Ink: Memento Tuxedo black, Daffodil Delight - SU, Real Red - SU
Alcohol Markers: Blendabilities; Cherry Cobbler, Skint Tone, Daffodil Delight
Stamps: Secret Garden - SU, Gorgeous Grunge - SU, Work of Art - SU
Dies: Secret Garden Thinlets - SU
Embossing folder: Christmas Elegance - Sizzix
Misc.: Foam mounting squares, 5/8" red organza ribbon

Thanks for stopping by! Hope to see you again soon.

Monday, April 20, 2015

Secret Garden

Quite some time ago, before the set retired, I purchased the Secret Garden stamp set and matching thinlets only to place it on my shelf and forget about it. While putting away my latest SU order (had to take advantage of the free shipping offer) I came across the set again and realized I had yet to use it.

Here is the first card I made with the Secret Garden stamp set. I of course had to use my Blenadabilities, I still need lots of colouring practice after all.


As you can see I haven't had the chance to finish the inside of the card yet. I plan to add a coloured blossom with my greeting once I'm ready to I use it.
I chose bright spring tones and opted for embossed leaf stems for the background. I coloured these with my Blendabilities. My blossoms were die cut and popped with foam squares. I also added a little sequins as, in my opinion,  a bit of bling never hurts. 

Supplies used:
Cardstock: Recollections
Alcohol markers: SU Blendabilities; Soft Sky, Daffodil Delight, Skin Tone, Old Olive, Cherry Cobbler (blended with yellow to make the orange center)
Ink: Memento Tuxedo Black
Dies: Secret Garden Framelits - SU, Olivia Alphabet - Cuttlebug (greeting)
Stamps: Secret Garden - SU
Embossing Folder: Leafy Branch - Cuttlebug
Misc.: Gold sequins, 5/8" light blue organza ribbon, foam mounting squares

Thanks for stopping by! Hope to see you again soon.

Friday, April 17, 2015

Graduation Treat Wrapper

This cute little graduate would make a great favour or even a place marker for a grad party.
You could also adjust the Cap design by using my punch art grad cap from here instead and only use 1 "handled" section of the curvy keepsake box to make a flat version for the front of a card.


My version is a girl grad with her hair pulled back. But you can play around with various punches for long hair (wide oval, or several scalloped oval for example), or shorter boy hair with just one double punched circle.

Supplies used:
Cardstock: Bazzill
Ink: Crumb Cake, Cherry Cobbler, Soft Sky - SU
Die: Curvy Keepsake - SU
Punches: see below instructions
Misc.: red mini tassel, 1 x 1/8" black brad, white gel pen, black marker, rose/red chalk, paper scrap for diploma and red/white bakers twine.

Full punch art instructions below.
Note I used 2 scrap pieces of black that were folded in half to attach the top of the cap to the top of the head.


Thanks for stopping by. Hope to see you again soon!

Wednesday, April 15, 2015

You Did it! Card

Today I am sharing the details of my graduation card. This was a really quick and easy punch art projects.


I used some of my recycled take out container lids, but regular silver foil cardstock will work just as well. Note the tassel is just a little piece of cording that I knotted towards one end and then frayed the other end to simulate the look of a tassel. I attached this to the top of my cap with a little black brad.

Supplies used:
Cardstock: Bazzill
Stamp: Sprinkled Expressions - SU
Die: Banner Framelits - SU
Punch: banner punch - SU (punch art instructions see below)
Embossing Folder: Lucky Stars - SU, Stripes - SU
Ink: Real red and Basic Black SU markers
Misc: foam mounting squares (cap and little red banner), tiny rhinestones and silver sequins

Punch art instructions are below.


Thanks for stopping by! Hope to see you later this week for my little graduate treat holder.

Monday, April 13, 2015

Graduation gift box

Times sure flies when you aren't paying attention. I can't believe my middle child is graduating high school this year. Children grow up way too fast!

In honour of his graduation I have completed a few projects for the big day next month.
First up is a cute little gift box:


This was made with the curvy keepsake box die. It's the perfect size for a grad ring.
The top of the hat is made from a  3 1/4" square piece of cardstock;  I just cut a slit in the center to fit over the handle. To do this mark center point with a ruler and cut a line approx. 1 3/8" to create a slit that will fit over the box handle
 
I have two further graduation projects coming up. Here's a sneak peek at the complete set. I have not had a chance to write the punch art instructions yet. So the other two projects will be for later this week.


Supplies used for the gift box:
Cardstock: Recollections and Bazzill
Stamp: Tagtastic - SU
Ink: Memento Tuxedo black
Punches: Scallop oval - SU, Modern Label - SU
Die: Curvy Keepsake - SU
Misc.: red tassel, x-acto knife.

Thanks for stopping by. Hope to see you again soon

Friday, April 10, 2015

Sketched Flower Cards

Last but not least into my exploration with the Petals Potpourri stamps I made these two beautiful cards using the sketched flower stamp and my Blendabilities markers.


 I love how these turned out. They are more along the lines of CAS cards, but with a little pop as the flowers are very dimensional. I also am really liking a few discs of sequins here and there for a tiny bit of bling. And to be honest I never thought I'd be a fan of sequins.


As you can see my flowers have three layers, two petal layers that were manipulated a little with shaping tools to ass a curve and the center. All three layers have been popped with foam squares.
For the Daisy I shaded my petals a little with Soft Sky Blendabilities.

 
Supplies used:
Cardstock: Recollections 110 lbs white
Stamps: Petal Potpourri - SU, Gorgeous Grunge - SU, Crazy About You - SU
Ink: Tuxedo black - Memento, Daffodil Delight - SU, Chocolate Chip - SU
Alcohol markers: Blendabilities - SU , Daffodil Delight, Old Olive, Soft Sky and Skin tone.
Punch: Flower Medallion - SU
Misc.: Gold and silver sequins, foam mounting squares 
 
 
Thanks for stopping by! Hope to see you again soon.

Wednesday, April 8, 2015

A Little Kindness

My Second card using the Petal Potpourri stamp set and matching punch is a cheerful one featuring vibrant colours and the painted flower stamp.


Note I used the same flower stamp to create my leaves. Just stamp in green and cut apart individual petals or sections of a small and large petal to create matching leaves.

I layered my flower using foam mounting squares between each layer for added dimension as can be seen in this close up:


Supplies used:
Cardstock: Recollections 110 lbs white
Ink: Daffodil Delight, Crushed Curry, Strawberry Slush, Pear Pizzazz, all SU
Stamps: Petal Potpourrie - SU, Gorgeous Grunge - SU, Kinda Eclectic - SU
Punch: Flower Medallion
Die: Banner Framelits - SU
Misc.: Gold sequins, foam mounting squares 
 
Thanks for stopping by! Hope to see you again soon. 


Monday, April 6, 2015

A Simple Hello

I hope everyone had a wonderful Easter holiday!
 
This week I've decided to create some cards using another new SU Stamp set (before it ends up on the shelf unopened and unused) Petal Potpourri and of course the matching punch.

First up is a simple card using the doily flower.


I used this stamp two ways; first to create the doily border behind my black ribbon, and then to create my accent flower. I used two white layers. The first was shaped from the back using a shaping tool and foam mat. The second I cut the petals apart, then shaped those the same way. I glued the four larger petals to the center top of my first layer and then added the smaller ones in between, off set.
A black rhinestone finished off the center of my flower and all the large petals have a tiny clear rhinestone on the tip.

Here is a bit of a closer look at the finish flower:

Supplies used:
Cardstock: Bazzill, Recollections white
Stamp: Petal Potpourri - SU
Ink: Memento Tuxedo black
Die: Hello you Thinlits - SU
Punch: Flower Medallion - SU
Misc.: 2" wide black ribbon, 1 x 1/4" black rhinestone, 8 x 1/16"clear rhinestones

Thanks for stopping by! Hope to see you again soon.

Thursday, April 2, 2015

Peek-A-Boo Bunny Card

And last but not least, today I have my Peek-a-Boo Easter bunny gift card set. Again these are smaller 4 x 4" cards.


As mentioned on my previous sets, you can make only eon card and use one image on the outside and the other on the inside if you like.

Here's a closer look at the front:


And a clsoer look at the escaping bunny:


Supplies used:
Cardstock: Recollections 110 lbs white and Bazzill
Stamp: Crazy About You - SU
Ink: Memento Tuxedo Black, Sahara Sand, Calypso Coral, both SU
Die: Circles - Framelits - SU
Punches: see instructions below for details
Misc.: Foam mounting squares, 3/8" blue gingham ribbon, 3 x 3/8" pearls for each card, black marker, white gel pen, rose/red chalk

Full instructions are below.


Thanks for looking! Hope to see you again soon.

Wednesday, April 1, 2015

Peek-A-Boo Chick

Tonday I have my second Peek-a-Boo card set, this one features an adorable little chick (it reminds me a little of the Suzie Zoo duck).


Again i made a set of 2 cards, but you could sue one image on the front and the other on the inside and make just one card.

Here are the close-ups, front:


and the back of our little escaping critter:


Supplies used:
Cardstock: Recollections 110 lbs white and Bazzill
Stamp: Crazy About You - SU
Ink: Memento Tuxedo Black, Daffodil Delight, Tangerine Tango, both SU
Die: Circles - Framelits - SU
Punches: see instructions below for details
Misc.: Foam mounting squares, 3/8" green gingham ribbon, 3 x 3/8" pearls for each card, black marker, white gel pen, rose/red chalk

Full instructions are below.


Thanks for stopping by! Come back later this week for the third, and last, of my 4 x 4 " Easter card sets.
Related Posts Plugin for WordPress, Blogger...