Showing posts with label fall. Show all posts

Monday, June 13, 2016

Fox Builder Garden Punch Art Scene

As of late I have had fairy gardens on my mind a lot. See, my girls group gets together once a month and while chatting, enjoying a bite to eat (and a possibly glass of wine) we try to get some crafting done. For our next get-together we are planning on making terrariums. While looking at various plant choices and containers we found so many adorable little fairy garden decorations that we are having a hard time deciding what to use.

So while making the toad stool used on my last card the idea of making a fairy garden scene was foremost in my mind and this fun card came to life.


For the cloudy background the same brayer technique was used as with the woodlands embossing folder; brayer blue ink onto the raised side before embossing.

I love the Swirly Scribbles border and it definitely lends itself well for grassy grounds.
The mushroom was created the same way as the toadstool from my last card. Punchart instructions for all pieces are below.

Supplies used:
Cardstock: Recollections white, misc. scraps of Bazzill and Recollections
Ink: Marina Mist, Chocolate Chip, Mossy Meadows, Tangerine Tango, Sahara Sand - all SU
Embossing folder: Cloudy Day - SU
Dies: Greetings Thinlits - SU, Swirly Scribbles Thinlits - SU
Misc.: White gel pen, foam tape/mounting squares

Punch art instructions:


Thanks for stopping by! Hope to see you again soon. 

Thursday, June 2, 2016

Fox Step Card

I had a request to make a nature themed card. it needed to be somewhat fancy and perfect for a lover of the outdoors. After some thought I cam up with a wonderful idea but needed to find the time to actually work on it.

Well, it took almost three hours but I did it. I finished this beautiful, woodsy fox last night.


I chose to do a center step card, with 3 small steps so that i could create a foreground, the fox in the middle of the woods and hen a background frames by trees on either side.


This is a standard A2, 5.5 x 4.25" horizontal card. The left and right panels are each 1" wide.
The center steps, form front to back are 1", 1.5" and 2" in height


I sponged the sky in Marina Mist, the ground in Mossy meadow and Baked brown Sugar.
Each center panel was sponged with the same ground colours as the front one.

To create the back panel I sponged both ground colours onto the bottom of the Woodlands embossing folder and then using a brayer added the blue for the sky and then embossed onto a white piece of card.

The trees framing the card on either side were embossed on white card and then cut out using an x-acto knife.
All the trees where finished by sponging with a touch of Sahara Sand and colouring in the texture with an Early Espresso marker.

The bushes (a total of 40 are the tree from lovely as a tree stamped in Always Artichoke and sponged in Mossy Meadow and Baked Brown Sugar and then hand trimmed from the cardstock.


I stamped the fox image using Memento ink and then coloured him with Copic markers - C7 around the ears and nose, Y35 and YR24 for the eyes, YR24, YR04 and R24 for the body. The grass is YG25 and the 2 lighter tones in SU's Olive Green Blendabilities.

The background images was trimmed to 4.25" in height and adhered to the back center panel 2 bushes and the fox to the middle center panel (the fox and froth bush using foam tape)

One bush was glued to the front right and then the tree panels are glued to either side panel. The last bush was attached using foam tape to the front left.


the greeting was mounted on skinny banners and attached to the back panel with foam. To match the colours perfectly I inked the matting banners in Baked brown Sugar and Mossy Meadow.

This card would also be perfect for Father's Day.


Supplies used:
Cardstock: Recollections white
Stamps: The Wilderness Awaits, Lovely as a Tree, Remembering your Birthday - all SU
Ink: Mossy Meadows, Baked Brown Sugar, Sahara Sand, Always Artichoke, Marina Mist - all SU, Tuxedo Black - Memento
Embossing folder: Woodland - SU
Punch: 1: square to cut banner tails
Markers: Y35, YR24, Y04, R24, YG25, C7 - Copic, Old Olive - SU Blendabilities
Misc.; foam squares/mounting tape

Thanks for stopping by! Hope to see you again soon. 

Wednesday, February 17, 2016

Wilderness Birthday

I made this card for my Dad's birthday. He now lives overseas and doesn't get much of a chance to go hunting anymore but he always enjoyed it when he lived here. He never did shoot anything, he left that up to his buddies.
I thought he'd enjoy this scene created with the Wilderness Awaits set and the woodlands embossing folder.

It's funny how I always think I have a sufficient amount of Copic markers for the time being and then proceed to colour something new only to realize I was wrong. This happened again while working on this card. Believe it or not the only actual brown shades I currently own are the skin tone Blendabailities from SU. They are a little on the dark side and did not make the colouring very easy. Nonetheless it turned out ok.

The card was created with the same technique of stamping the inside of the embossing folder, embossing the cardstock and then colouring the images. Instructions can be found here


Supplies used:
Cardstock: Bazzill and Recollections
Stamps: The Wilderness Awaits, In the Meadow, Morning Meadow, all SU
Embossing folder: Woodlands - SU
Ink: Chocolate Chip, Early Easpresso - SU, Tuxedo Black - Memento
Markers: Early Espresso, Old Olive - SU
Alcohol markers: C1, C3, W1, E11, 0 - Copic, Skin Tone Blendabilities - SU
Misc.: 3 x 1/8" antique brads, brown butcher's twine
Thanks for stopping by! Hope to see you again soon. 

Saturday, November 14, 2015

Burnished Gold Blossom

As I did finish colouring this image, despite the gold embossing, I thought I'd share it as well.
As noted in my last post, I don't recommend anyone else trying this unless you have a very steady hand and are willing to risk your marker tip.
Instead I would recommend investing in some good quality metallic ink (now definitely on my wish list) and then clear embossing to get a similar finished look.


I really love the colours in this one as I tend  to lean more towards warm tones. This has a definite fall feeling to me.


I started by stamping both the leafy image and the lotus blossom onto scraps of white cardstock. Heat embossed the images in powder gold and then coloured with Copic markers. Both images were fussy cut and then glued to the brown die cut shape which was trimmed at the top to fit the card front.


The green mat was dry embossed with diagonal stripes and cut the width of my card base. The sentiment was stamped towards the right side in dark brown. The card background mat consists of a very golden pattern paper that was inked in brown along the edges. For finishing touches a gold organza ribbon bow and a few gold rhinestones were added.

Supplies used:
Cardstock: Recollections white, Bazzill brown and green
Patterned paper: MME "Reunion" 6 x 6 " paper pad
Stamp: Remarkable You, Tin of Cards - both SU
Ink: Versamark, Early Espresso - SU
Alcohol markers: YR04, YR24, YR32, YR35, YG03, YG25, 0 - blender pen - Copis, Olive Green 
                             (lightest) - SU Blendabilities, 
Die: Apothecary Accents - SU
Embossing folder: Stylish Stripes - SU
Misc.: Gold organza ribbon, Gold rhinestones - both Crafts by Dollarama, powder gold embossing powder - the Stampers Edge


Thanks for stopping by! Hope to see you again soon. 

Thursday, October 15, 2015

Autumn Birch Trees

Behind our house we have a green belt going up the hill. It is a place were people can walk their dogs (off-leash if they like). The hills is scattered with wild grasses and several groupings of birch trees. One group of trees is right behind our house. Looking out my kitchen window as the sun set the beautiful birch trees almost looked like were on fire with their pretty golden leaves shinning brightly in the setting sun.

With this image in mind I made this pretty card.


I used the foliage stamp from Sheltering tree to stamp light green and golden leaves directly onto my embossing folder before I embossed the cardstock. I also added sparkly gold sequins to mimic the bright reflecting sunlight. The little bird is perched on a branch cut from the Tim Holtz branch tree die and placed in front of the embossed trees. I clipped a few "slits" into it to simulate the birch bark design.

Supplies used:
Cardstock: Recollections white
Stamps: Sheltering tree - SU, everything Eleanor - SU
Ink: Pear pizzazz, Hello honey, Crushed Curry, Chocolate Chip, Early Espresso - all SU
Embossing folder: Woodlands - SU
Die: Greetings Thinlits - SU, Branch Tree - Tim Holtz
Misc.: gold sequins, foam mounting tape

Thanks for stopping by! Hope to see you again soon.

Monday, October 12, 2015

Woodlands in Autumn

It's been a busy last few weeks and I haven't had as much time to play as I had hoped. I did get my SU order unpacked, cataloged and organized. And this past week I managed to squeeze in a few moments to play with the Woodlands embossing folder.

I created 2 fall inspired cards,, the first is A2 (4.25 x 5.5") in size:


I inked up the embossing folder with Mossy meadow for a rich green woodsy background colour and then proceeded to emboss my white paper.
My bird was coloured with alcohol markers and placed on the large branch in the front f the scene.
I also added some leaves and a silhouette bird behind my greeting. The veining on the leaves was created with a spider web embossing folder.

Supplies used:
Cardstock: white Recollections, scraps of brown and orange Bazzill
Stamps: Language of Friendship - SU, Morning Meadow - SU
Die; Autumn Accents Bigz - SU
Embossing folder: Woodland - SU, Spiderweb - SU
Ink: Mossy meadow - SU, Cajun Craze - SU, Basic Black - SU, Tuxedo black - Memento
Alcohol markers: Cherry Cobbler, Smokey Slate, Skintone - SU Blendabilities, Copic Y35
Misc.: Early Espresso stitched ribbon - SU, black marker, foam tape


my second creation with this great embossing folder is a 5.5 x 5.5" square card (love that this embossing folder accommodates larger cards):


In case you are wondering, I use a Cuttlebug and yes, these large square SU embossing folders will fit!
I sued the same technique, ink pad to embossing folder, to create the night sky background. I then added some green and brown with sponges to the lower area of the folder to create the illusion of soil and bushes. I did not (at least not yet) purchase the matching stamp set to this embossing folder. So I looked through my assortment of stamps and  found the Take Three set. I used the small birch leave and my tiny PB birch punch (not a perfect match but close enough).

Supplies used:
Cardstock: Recollections white, dark brown
Stamps: Take Three - SU
Embossing folder: Woodland - SU
Punches: Deco Label - SU, Mega oval (70 mm) - PB
Ink: Cajun Craze, Cherry Cobbler, Hello Honey, Pimpkin Pie, Chocolate Chip, Mossy Meadow, Night of Navy - all SU
Markers: Basic black, Mossy Meadow, Hello Honey, Cherry Cobbler - all SU
Misc.: 1" wide dark brown satin ribbon, foam mounting tape

Thanks for stopping by! Hope to see you again soon.

Saturday, September 26, 2015

Feathers for a friend

I have one more card to share using the Four Feathers set. I kept this one on the simple side, but am very proud to say, I finished the inside (single layer) to match.


Not really a lot of instructions needed for this one. The photo is pretty self explanatory. The feathers were all stamped on scrap paper and then die cut and attached to the card as I was too lazy to create masks. The small feather in the front was glued to the card front only at the bottom, the top I adhered using a bit of foam tape for some added dimension.

Supplies used:
Cardstock: Recollections white
Stamps: Four Feathers - SU, Gorgeous Grunge - SU, Simply Wonderful - SU
Ink: Cajun Craze, Hello Honey, Tip Top Taupe, Pear Pizzazz - SU
Dies: Feathers Framelits - SU
Misc.: yellow and gold sequins, foam tape/mounting squaresThanks for stopping by! Hope to see you again soon.

Thursday, September 24, 2015

Falling Feathers

My next venture into the Four Feathers stamp set took me down the emboss resist road.
I again chose rich autumn colours.


First I randomly stamped the small feather image onto my white background with Versamark. Then the feathers were embossed with clear embossing powder.
Next I sponged the background with Pear Pizzazz  and Hello Honey. Last step is to stamp the second small feather image randomly in |Cajun Craze. Then use a tissue or baby wipe to remove the excess ink form the embossed areas.

I finish the card with a bit o edge sponginess and a simple wrap of bakers twine. Also couldn't resit a tiny bit of blink so i added a pearl to my sentiment tag. the pearl was coloured with alcohol markers.

Supplies used:
Cardstock: Recollections white
Stamps: Four Feathers - SU, Petite Pairs - SU
Ink: Pear Pizzazz, Hello Honey, Cajun Craze - SU, Versamark
Punch: Ticket Due - SU
Alcohol marker: Copic YR24 and YR04
Misc.: brown bakers twine, foam mounting squares,m 1 x 1/4" pearl, clear embossing powder.


Thanks for stopping by! Hope to see you again soon.

Wednesday, September 23, 2015

Fall Feathers Shaker Card

It's that time of year again. SU has brought out their Holiday Catty and I had the hardest time deciding what to order as there are so many great things to choose from.
I was lucky enough though that for my birthday earlier this month my DH and DD paid for my SU Holiday order. This means I have more wonderful tools coming end of the week than I had thought possible, but it also means in order to justify the purchases I really need to try and use some of the stamp sets I purchased in the last year that are still sitting on my shelf in untouched packages.

The first of these sets is the Four Feathers stamp set and matching dies. I've had this for quite some tie and did indeed pull it off the shelf several times only to find myself uninspired.

I let the beautiful hues of autumn inspire me. Yes, fall has come to Calgary rather quickly. Last week the trees were still green and this week they are changing colour faster than one can enjoy it.

With fall being my inspiration I chose several lovely earthy tones for my cards.

First up is this pretty shaker card that I filled with sequins and micro glass beads.


I sponged my shaker background with several colours before filling it. The shaker opening was cut using both feather dies and accented with a few more stamped and cut feathers.

Supplies used:

Cardstock: Recollections white
Stamps: Four Feathers - SU, Gorgeous Grunge - SU,  Fall Fun - SU
Ink: Hello Honey, Cajun Craze, Tip Top Taupe, Pear Pizzazz - SU
Dies: Feathers Framelits - SU
Misc.: brown bakers twine, micro glass beads, sequins, acetate, foam mounting tape

Thanks for stopping by! Hope to see you again soon.

Thursday, September 17, 2015

Embroidered Autumn cards

If you are anything like me, you have many wonderful tools in your stash that you just had to have when you saw them only you bring them home and not get around to using.
Today I am sharing a set of cards I made with just such a tool.

Several years ago I saw a few scrapbook layouts online that where absolutely beautiful. One of the most striking things about them was these gorgeous embroidered borders. It took me a few days to figure out how they were created when I discovered Bazzill Basics Paper Embroidery templates.
I decided to purchase two sets, as well as a pack of needles. I was overly excited when I found them in the store and brought them home with glee. Unfortunately life got in the way and I didn't get the chance to try them out in the next few weeks. Then came along a few craft room reorganizations and these templates found a home on my wall rack between alphabet stickers and doily packs; where they were fast forgotten,

Last weekend I decided it was high time to give them a try. As I planned on making cards I chose the smaller swirls and leaves set versus the large 12" border set. I chose to go the CAS route as it really highlights the pretty designs.

I absolutely love how these turned out. So much so, I may not give them away as a gift as originally planned (or I may just have to make a second set for myself).


I am by no means talented at embroidery. In fact I haven't had a needle and floss in my hands sine grade school. But I have to say these were relatively fast and easy.

I used really only two types of stitches, the running stitch and the split stitch. I used dollar store embroidery floss at full thickness (5 threads).

The templates are transparent plastic with a black outline design printed on them and evenly spaces along the lines are small 1/8" holes. You place your cardstock on top of  a piercing mat, then place the template on your card where you like t and using a needle or piercing tool pierce along the designs where the holes are. Then follow the pierced design when you stitch. Really simple.

I think it would actually be rather simple to make these templates. Use some acetate, stamp a scroll, line or flourish design with black StazOn and then use a hand held 1/8" hole punch to evenly spaced punch holes along the design. I'm really itching to try this with the spider web from web wishes.

Here are close ups of my three cards.


Supplies used:
Cardstock: Recollections white, Chocolate Chip - SU
Ink: Chocolate Chip - SU
Stamp: Express Yourself - SU
Misc.: Bazzill template, brown embroidery floss, small pearls, foam mounting squares 


Supplies used:
Cardstock: Recollections white, Cajun Craze - SU
Ink: Tangerine Tango - SU
Stamp: Sincere Salutations - SU
Alcohol Marker: Copic YR04 blended with SU Blendabilities Skintone (light brown)
Misc.: Bazzill template, orange embroidery floss, small pearls, foam mounting squares 


Supplies used:
Cardstock: Recollections white, Bazzil Leapfrog
Ink: Wild Wasabi - SU
Stamp: Whimsical Words - SU
Alcohol Marker: SU Blendabilities Old Olive
Misc.: Bazzill template, green embroidery floss, small pearls, foam mounting squares 

Thanks for stopping by! Hope to see you again soon.

Monday, September 14, 2015

Hello Teacher

With school just having started this is a great time to welcome new teachers.
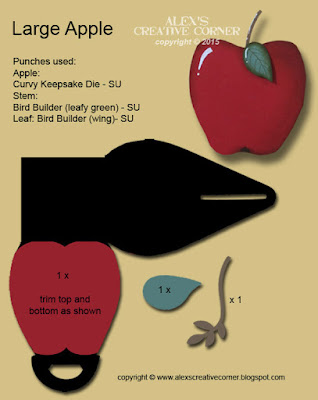
With that in mind I made a hello teacher card with the aid of my trusty Curvy Keepsake die.


I needed a nice, large apple for my design but didn't have an apple die. So I decided to use the largest curved shape I had and turn it into an apple. It was really easy with just a little curved trimming at the top and bottom - photo instructions are below.

Supplies used:
Cardstock: Bazzill, Recollections white
Stamp: Stampology (note book paper) - Autumn leaves
Punch; 1 3/8" circle (to punch the pocket opening, Bird Builder - SU
Dies: Hello Thinlits - SU, Little Letters - Die-namics, Curvy Keepsake - SU
Embossing folder: Rulers - Tim Holtz
Ink: Chocolate Chip, Cherry Cobbler, Crushed Curry, Mossy Meadows, Tangerine Tango, Marina Mist - SU
Misc.: Black marker, white gel pen, foam mounting squares

Punch art instructions below.


Thanks for stopping by! Hope to see you again soon.

Monday, August 3, 2015

Tree Builder Fall Wreath

It may still be summer but I am starting to plan my fall projects as it always seems to sneak up on me.
On top of that with back to school, Thanksgiving and Halloween the time always seems to pass too quickly.

So when this idea came to me I had to create it right away just in case later I won't have enough time.


The wreath is made with one punch, the new SU Tree Builder punch. The wreath base uses 12 bare tree punch outs.


The decorations consist of 3 birds, 5 apples and 15 drops (use as leaves). All shapes were inked in a coordinating colour.


The finished wreath was attached using 1/8" foam squares.

Supplies used:
Cardstock: Bazzill, Recollections for the base
Stamp: Because you Care - SU
Ink: Memento Tuxedo Black, SU: Tangelo Twist, Mossy Meadow, Chocolate Chip, Cherry Cobbler, Crushed Curry
Die: Banners Framelits - SU
Punch: Tree Builder - SU
Misc.: black marker, foam squares, Always Artichoke seam binding - SU

Thanks for stopping by! Hope to see you again soon.

Wednesday, May 6, 2015

Witchy Birthday

This is a delightful birthday card that would also make a cute Halloween card or tag; and as promised was made using the mustache die.


I chose to decorate the cute witch shoes with silver buckles, but little ribbon bows (maybe in purple) would look just as good.

Supplies used:
Cardstock: Bazzill, Recollections
Ink: Cajun Craze - SU, Real Red Marker - SU
Font: Arabic Typesetting, Freestyle Script
Die: Timeless Rectangle - Nestabilities - Spellbinder
Punch: Decorative label - SU, for punch art see below instructions
Misc.: 5/8" black organza ribbon, 3 x 1/16" rhinestones, white gel pen, foam mounting squares

Full punch art instructions are below:


Thanks for stopping by! Come back soon for more cute mustache die creations.

Tuesday, May 5, 2015

Mustache Witches Hat

Continuing with my "off" season theme of Halloween, I have another mustache punch art to share. A cute little witch's hat.


I created a little buckle from silver foil, but you could easily just have the hat band, or even add a bow id you don't have the little square punches. Another option would be to hand cut the buckle.

Supplies used:
Cardstock: Bazzill, Recollections
Stamp: Party Punch - SU
Ink: Cajun Craze - SU, Perfect Plum - SU, Crushed Curry - SU, Basic Black marker - SU
Die: Two Tags - SU, Mustache - SU
Punches: Itty Bitty Accents (star) - SU, Round Tab - SU, 2" circle - SU, for punch art see below instructions.
Embossing folder: Lucky Stars - SU
Misc.: foam mounting squares, white gel pen, 1/4" orange ribbon, scrap of silver foil card

Punch art instructions below:


Thanks for stopping by! Hope to see you again soon for more mustache creations.

Monday, May 4, 2015

Mustache Ghost

Today's mustache art is so simple it doesn't require any cutting.
When I looked at the mustache die on a slight angle I immediately saw the shape of a cute little ghost.
It's so simple it feels like cheating.


Supplies used:
Cardstock: Recollections and Bazzill
Stamp: Toxic Treat - SU
Ink: Rich Razzleberry - SU, Soft Sky - SU, Crushed Curry - SU, Memento Tuxedo Black,
Punches: Round Tab - SU, Itty Bitty Accents (star) - SU, 3/4" circle and 2" circle
Die: Two Tags - SU, Mustache die - SU
Embossing Folder: Lucky Stars - SU
Misc.: Black marker, white gel pen, 5/8" green ribbon, staple, red & white bakers twine, foam mounting squares

Thanks for stopping by! Hope to see you again soon for more fun "mustache" punch art.

Friday, April 10, 2015

Sketched Flower Cards

Last but not least into my exploration with the Petals Potpourri stamps I made these two beautiful cards using the sketched flower stamp and my Blendabilities markers.


 I love how these turned out. They are more along the lines of CAS cards, but with a little pop as the flowers are very dimensional. I also am really liking a few discs of sequins here and there for a tiny bit of bling. And to be honest I never thought I'd be a fan of sequins.


As you can see my flowers have three layers, two petal layers that were manipulated a little with shaping tools to ass a curve and the center. All three layers have been popped with foam squares.
For the Daisy I shaded my petals a little with Soft Sky Blendabilities.

 
Supplies used:
Cardstock: Recollections 110 lbs white
Stamps: Petal Potpourri - SU, Gorgeous Grunge - SU, Crazy About You - SU
Ink: Tuxedo black - Memento, Daffodil Delight - SU, Chocolate Chip - SU
Alcohol markers: Blendabilities - SU , Daffodil Delight, Old Olive, Soft Sky and Skin tone.
Punch: Flower Medallion - SU
Misc.: Gold and silver sequins, foam mounting squares 
 
 
Thanks for stopping by! Hope to see you again soon.

Sunday, March 8, 2015

Sheltering Tree

I wasn't sure which one of my new stamps sets to try out next until I came across a fun challenge at SCS entitled "Sheltering Friends". A that point I knew Sheltering Tree was the next set to get my attention.

I had so much fun playing with these stamps I made four cards to represent each of the seasons.
They look so pretty all in a row. Almost to nice to use.

 
Even though it's a little bare compared to the others, winter seems to be my favourite (funny considering I usually lean towards warm autumn colours). I added a bit of glitter to my snow with PSX sparkles for that extra special touch.


For the spring theme I decided on cherry blossoms just as they are finishing and falling from the trees. It not easy to spot but I added tiny little pearls coloured with alcohol markers to the blooming tree. The pearls at the top and bottom of the card were also coloured with markers.


Summer has very vibrant colours and pretty flowers. I do not currently have purple Blendabilities so I opted for little accent buttons instead of coloured pearls.  I also had this pretty gem butterfly in my stash that seemed to fit nicely.


Fall comes to life in pretty golds and brown, and a few coloured pearls.


I also made the insides of the cards to match. I didn't add a sentiment here though in order to leave room for a personal message.


Supplies used:
Cardstock: Recollections
Patterned paper: various old plaid scraps
Stamp: Sheltering Tree - SU, Festival of Trees (bird) - SU
Ink: all SU
       Winter: Soft Sky, Chocolate Chip, Cherry Cobbler, Basic Black
       Spring: Pear Pizzazz, Blushing Bride, Chocolate Chip, Basic Black, Crushed Curry
       Summer: Garden Green, Pear Pizzazz, Daffodil Delight, Pumpkin Pie, Rich Razzleberry,
                       Chocolate Chip, Basic Black
       Fall: Old Olive, Cajun Craze, Crushed Curry, Always Artichoke, Chocolate Chip, Basic Black
Blendabilities Alcohol Markers, to colour my rhinestones and pearls: Soft Sky (rhinestones), Skin
                      Tone, Daffodil Delight
Misc.: Rich Razzleberry stitched Ribbon, light blue organza ribbon, pearls, clear rhinestones, rhinestone/gem butterfly, tiny 3/16" purple buttons, foam mounting squares

Thanks for stopping by! Hope to see you again soon.

Tuesday, January 6, 2015

Gift Card Set

It was a pleasant surprise when I received several requests this past Christmas for handmade card gift sets. I made several and just absolutely love how this set turned out so though I'd share it.

You may have guessed it, I recycled a tissue box again. This woodland scene box is a Royale box (you can see it on their website here) and has been tucked away in my stash for some time just waiting for the right project.

Believe it or not, all eight cards were made from the one box, and it's not a very big one. I did use every square inch of it though.

Most of the cards are fairly straight forward so I won't be listing full instructions for these, but there are supply list under each image. Also, I used some Diamond Sparkles by PSX on most of them. Usually on the trees, sometimes on the bird image. It doesn't show up as well as I had hoped in the photo's but you can see a little copper/gold shimmer here and there.

 
Supplies used:
Cardstock: Bazzill (white card base, ivory, dark brown, burnt orange)
Stamp: Itty Bitty Banners - SU
Ink: Early Espresso - SU
Punch: Banner - SU
Die: Bitty Banners - SU
Misc.:  PSX Diamond Sparkles, 5/8" orange organza ribbon, 3 x 1/4" rhinestones, foam squares (for the greeting)

 
Supplies used:
Cardstock: Bazzill (white card base, ivory, dark brown, burnt orange)
Stamp: Perfect Punches - SU
Ink: Early Espresso - SU
Punch: scallop oval - SU
Misc.: PSX Diamond Sparkles, 5/8" orange organza ribbon, 3 x 1/4" rhinestones, foam squares (for the greeting)

 
Supplies used:
Cardstock: Bazzill (white card base, burnt orange)
Stamp: Bloom with Hope - SU
Ink: Early Espresso - SU
Punch: 1 1/4" square - SU (to make banner tails), Lace Ribbon Border - SU
Die: Bitty Banners - SU
Misc.: PSX Diamond Sparkles, foam squares (for the banner)
 
 
Supplies used:
Cardstock: Bazzill (white card base, ivory, burnt orange)
Stamp: Feeling Sentimental - SU
Ink: Early Espresso - SU
Punch: 1 3/4" scallop circle - SU, 1/38" circle - SU
Die: Adorning Accents - Edgelit - SU
Misc.: PSX Diamond Sparkles, 3 x 1/4" rhinestones, foam squares (for scallop circle)
 
 
Supplies used:
Cardstock: Bazzill (white card base, ivory, apple green, dark brown)
Stamp: Six-Sided Sampler - SU
Ink: Early Espresso - SU
Punch:  1/38" circle - SU
Die: Adorning Accents - Edgelit - SU
Misc.: PSX Diamond Sparkles, 3 x 1/4" rhinestones, 5/8" orange organza ribbon, foam squares (for birds/squares)
 
 
Supplies used:
Cardstock: Bazzill (white card base, ivory, apple green, burnt orange)
Stamp: Vintage Frames - SU
Ink: Early Espresso - SU
Punch:  hexagon - Emagination, Artisan Label - SU, Jewelry Tag - SU
Die: Adorning Accents - Edgelit - SU
Embossing folder: Branches - Sizzix
Misc.: PSX Diamond Sparkles, 3 x 1/4" rhinestones, 5/8" orange organza ribbon, foam squares (for bird)
 
These last two are my favourites in the set.

 
Supplies used:
Cardstock: Bazzill (white card base, ivory, burnt orange)
Stamp: Itty Bitty Banners - SU
Ink: Early Espresso - SU
Die: Bitty Banners - SU, Door/Window - Impression Obsession
Embossing folder: Bricks - Tim Holtz - Sizzix
Misc.: 2 x 1/8" aged brads, foam squares (for greeting)


Supplies used:
Cardstock: Bazzill (white card base), Silver foil
Stamp: Perfect Punches - SU, Versamark pen
Ink: Early Espresso - SU, Cherry Cobbler - SU
Punches: 1 3/4" scallop circle - SU, 1 3/8" circle - SU
Embossing folder: Northern Flurry - SU
Misc.:  Red Embossing powder, Whisper White Stampin' Flock - SU, Heat & Stick - SU, foam squares (for greeting)
Note: I embossed the birds in red to make them look like cardinals for a more Christmassy feeling.
 
Thanks for stopping by! Hope to see you again soon.

Related Posts Plugin for WordPress, Blogger...